Ready to get started in video editing? At first, it may seem a little overwhelming, after all, there are plenty of articles, tutorials, and advice to be found online.
No worries though, we have you covered! Here we have a simple step-by-step breakdown for any beginning video editor.
Adding Music/Audio

Probably a fundamental aspect of a video should be its audio, or music if it has any. While you can experiment and create videos without audio, they feel incomplete.
The first thing to try is to add some background music or sounds and adjust the volume. Programs allow you to import songs in various formats or use sounds from the software’s internal library. Another cool audio trick is to add sound effects to enhance certain moments in the story.
Audio options also include noise reduction, which allows you to remove unwanted sounds from the audio.
Attached Text
Text will always be helpful to point out key aspects within the video, although it’s not mandatory. You can use it as bullet points or even subtitles. You can also add captions, which are increasingly used to make videos more accessible to deaf people.
Find out how to add effects to your text to make it triumphant and mighty, enhancing the storytelling.
Try Some Advance Features
As you gain confidence in your editing skills, you’ll realize it’s time to move on to more advanced features such as color grading, green-screen techniques and chroma keying for animation. These skills represent a step up in your learning, not so easy but totally manageable.
And Practice, a LOT
Practice is always the key to mastering something, lots of it. And as you edit videos with different styles and effects, you’ll gain a broad range of practical knowledge. In this way, you will test yourself to improve each project. Don’t forget: More practice means more confidence and more polished skills.
Seek for Inspo

Remember, seeking inspiration from others is always a wise move, and watching videos created by seasoned editors can be highly motivating.
Also, remember to look for video tutorials and online resources.
Remember that video editing is a skill that improves with time and practice. So go slow and steady, you’re learning something new and you need to enjoy it. Keep an open mind and your creativity will burst into unique stories. And keep practicing with the software you’re comfortable with first, then you can move on to another if you want.
To jump smoothly into this new hobby, gig, or professional path, these organizational steps would also help you.
Space Organization (Physical Space, Seat, Computer, Multi Monitors)

You’ll need to create your video editing workspace because this is going to be like your personal creative playground, where comfort and order spark your best ideas.
Check out these tips to design a workspace that will keep you organized, efficient, and energized.
Physical Space
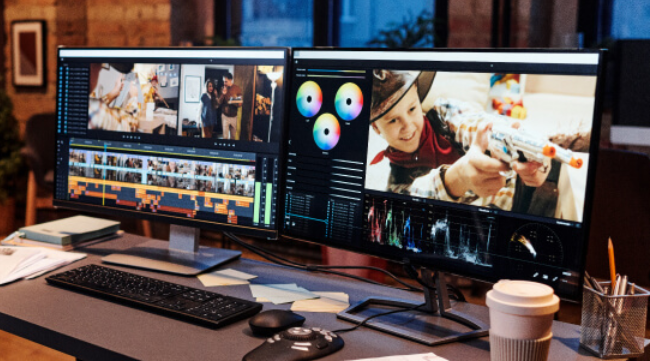
Pick a room with great light or a cozy corner with enough space for your setup. Arrange your computer, monitors (if you use extras), and editing tools like keyboards and controllers so everything you need is right within reach.
A bit of breathing room around your video editing is an essential skill in the digital era, whether for content creators, business professionals, or personal enthusiasts. With this guide you’ll learn everything you need to know about video editing, from choosing the right software for you to basic editing techniques. Ready to get started?
What is Video Editing?

Video editing is assembling, manipulating, and enhancing video footage.
It transforms raw clips into a cohesive, polished final product that effectively tells a story or conveys a message.
This process includes cutting clips, adding transitions, layering audio, and adjusting visual elements like color and lighting.
What you’ll need to master this craft!
- How to choose the right Video Editing Software
- Prep to Import Your Assets
- Get to know the Interface
- Start Learning Basic Techniques
- How to Add Transitions and Effects
- Add Music or/and Audio
- Attached Text
- Try Some Advance Features
- And Practice, a LOT
- Seek for Inspo
This practical guide will lead to a successful and easy to follow path on how to start editing videos. So, let’s break this down!
How to choose the right Video Editing Software

It all starts with the choice of software, and not just any software, but the right software for you. You will do this according to your skills, goals, and some critical elements of your computer.
In case you’re a beginner, you’ll need to choose a program that counts with simple and basic options. These include software such as Adobe Premiere Elements, iMovie (for Mac users), and Windows Movie Maker (for Windows users).
Get ready to Import your Files
The next step is to import all the files you’ll be working with into your chosen software. They will all become one project. This should include: graphics, audio files, images, clips, even typography.
Tip: Creating folders will make it much easier to organize and edit everything.
Get to know the Interface
Immerse yourself in the editing software and explore it as much as possible to familiarize yourself with the interface, shortcuts, features, and more. You can also watch video tutorials on the software you purchased.
By doing this, you’ll get a smoother experience in localizing fast and easy enough all the tools, and with everything organized, you’ll navigate the timeline like a pro. Understanding the design of the software will make everything easier, more efficient, and more practical.
Start Learning Basic Techniques
Try out the software’s tools to perform basic editing tasks such as cutting, trimming and rearranging clips on the timeline to place them where you want them.
Once you’ve mastered the basics of video editing, everything will fall into place and you’ll be able to tell your story the way you want. You can then move on to other, equally manageable actions at a second difficulty level.
Add Crossfading and Effects
Without crossfades/transitions your video will not be as fluid as it should be, so it’s an important feature to dominate. You need to find out where transitions are located in your software. They often have a preview of what the transition effect will look like.
If you want to apply a transition, simply select it and place it between the end of one clip and the beginning of another. The way you use them, between clips or at the very beginning and end of the video, adds a very interesting appeal to videos.
Choose your seat wisely
You’ll likely spend hours editing and fine-tuning details, so it’s important to prioritize your comfort. Adjust your chair’s height to keep your back aligned, and monitor at eye level to avoid neck strain. Also, invest in a supportive chair, and if you’re in this for the long haul, consider a wrist pad to keep those hands and wrists happy during intense sessions.
Computer Hardware
All this journey can’t happen without a capable computer, and for video editing, power is critical. So, be sure that your computer system has plenty of processing power, RAM, storage, and a dedicated graphics card for smooth rendering and playback.
You can check all this on the computer settings. This way, you’ll spend more time flowing with your creativity and less time waiting on loading bars or with slow-mo and stuck graphics.
Digital Organization (Media setup, Folders and Files, Monitor Calibration, Backup)
Setting up your digital workspace is all about getting organized and ready to unleash your creativity. Here’s a streamlined approach to building an editing hub that’ll make your workflow smoother and more efficient.
Install and Update the Chosen Software
First things first, install your video editing software and make sure it’s up-to-date. By updating to the latest version of the software, you can get the best performance from it without worrying about previous bugs or malfunctions.
Media Setup
A good filing system is everything! Remember that you can create folders for almost anything: clips, audio tracks, images, graphics and anything else. Sorting everything into these folders not only saves time but also keeps you from hunting down files mid-project.
Folders and Files
Dedicate a main folder for all your projects, with subfolders for each one. Make it precise by naming each aspect or element within specific folders in the inner project folder. This way, everything you need for a specific project is always in one place.
Monitor Calibration
Colors play a huge role in video editing, so look for accuracy in your monitor to help you make the best videos possible. So you should regularly calibrate your monitor to ensure true-to-life colors across devices, so what you create is exactly what viewers see.
You can do this digitally (using software or a tool) or manually (in your monitor’s settings, such as brightness, contrast, etc). This way, each shade and tone aligns perfectly, giving your work the polish it deserves.
Backup
A double save, extra copy or backup of your edit is a must when editing video, so don’t skip this step. You can back up your projects to the cloud, external hard drives or any way you like. This way, you’ll have peace of mind that your hard work is safe, no matter what. And yes, always remember to click on save when you’re working.
Let’s compare: What’s Essential & What’s Advanced Editing Techniques?
| Essential Techniques | Advance Techniques |
Importing video clips and audio Before making edits, import your media files and set up your project’s resources for smooth access. Then, with a media library created, name everything so you can organize and access it easily. Cutting, trimming, and splitting clips Precision is key! Learn to cut, trim and split any unwanted material to simplify your process. These skills keep your story tight and engaging. Creating seamless scene transitions Transitions connect scenes and ensure your video flows smoothly from start to finish. Experiment with transition effects and find the best moments to apply them, enhancing your storytelling. Adding and adjusting audio tracks Sound can make or break a video! Add background music, adjust audio levels, and include sound effects to add emotion and depth to your story. Good audio balance and clarity keep viewers hooked. Using text and graphics Text and graphics bring extra context and polish. Whether it’s a title, subtitle, or graphic, thoughtful use of these elements enhances your video’s professional look. Get creative, but keep it tasteful! | Filters and color correction Adjust brightness, contrast, and saturation to improve the look and feel of your video. You can bring out the best in your footage with a few tweaks. Keyframe animation and effects Keyframes let you animate elements like movement and opacity with total control. Practice with keyframes to add dynamic effects that make your content stand out. Green screen and chroma key The green screen opens up endless possibilities! With the chroma key, you can replace your video’s background with any image or video, adding professional flair. Slow Motion and Time-Lapse Playing with video speed, whether slowing or speeding it up, can add drama, humor, or intensity. Explore slow motion and time-lapse to enhance storytelling and make key moments pop. |

Time to Export and Share your Masterpiece
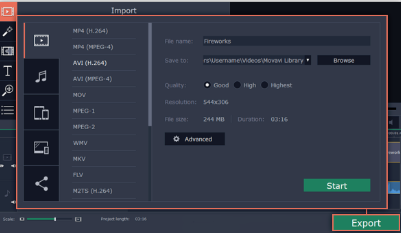
Once your video is finally done and you are sure you did a fantastic job, you’ll need to export it and, if you want, share it.
- Choose the correct format and resolution: Select a format and resolution that keeps your video looking sharp and makes it easy to play across different devices and platforms. High-definition quality is great, but pick the specs that best suit your audience.
- Compressing videos: If you want your video to be easy to share, which would probably be like a large file, you’ll need to compress it. Reducing the file size of your video without losing quality will make it easier to distribute without compromising on visual appeal, and you won’t struggle with uploading anywhere.
- Uploading to social media and video platforms: Now that your video is complete, share it with the world! Post it to platforms like YouTube, Instagram, or any other sites where your audience will find it. Don’t forget to pick an excellent title and hashtags for reach. Expanding your reach is as simple as hitting “upload.”
Conclusion
Finally, with dedication, creativity, and practice, you’ll be well on your way to mastering the art of video editing. This guide has provided the essential steps, from selecting the right software to adding advanced features that make your videos unique and engaging.
As you continue to hone your skills, remember to stay curious, explore new techniques, and seek inspiration from others. Whether creating content for work, personal enjoyment, or storytelling, video editing offers endless possibilities to express your creativity and captivate your audience.
So, get out there, keep practicing, and enjoy the journey of bringing your stories to life!
