

YouTubers edit their videos in many different ways. Sometimes, they use external editing software, and other times, they use the platform’s very own YouTube Studio.
No matter what software they choose to use, most YouTubers follow many key steps when creating content.
There are several key steps to follow to be successful during the video editing process, all the way through uploading the final product to the YouTube platform.
How to Use the YouTube Editor
If you don’t have any particular video editing software you prefer to use, YouTube has a built-in editor that allows you to trim your videos, add and adjust the sound, adjust ad breaks, and add additional on-screen content. Using the editor can be broken down into 21 simple steps:
Step 1
To get started in the YouTube editor, you first need to open YouTube Studio.
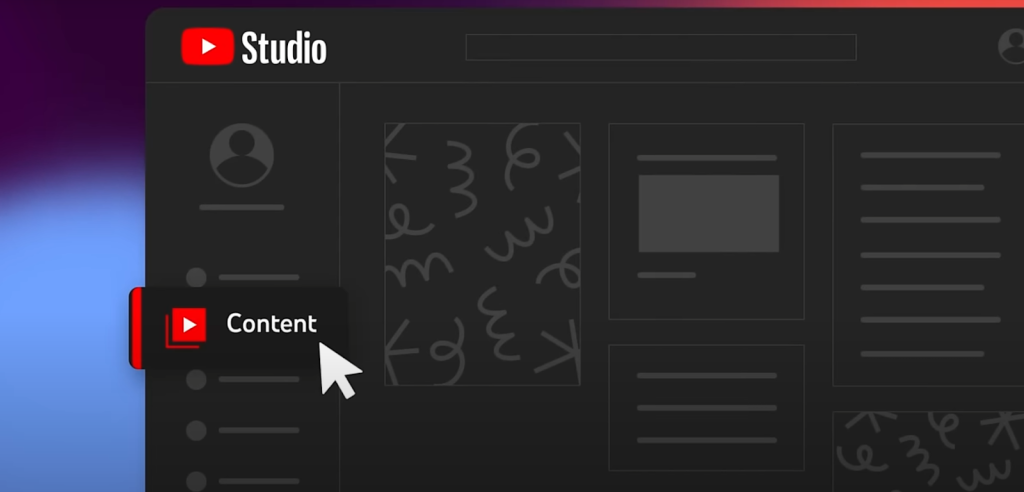
Step 2
Next, select “Content” from the bar on the left.
Step 3
Find the video you would like to edit.
Step 4
After hovering over the video, you should see a pencil icon below the title. Press this and open the “Details” page.
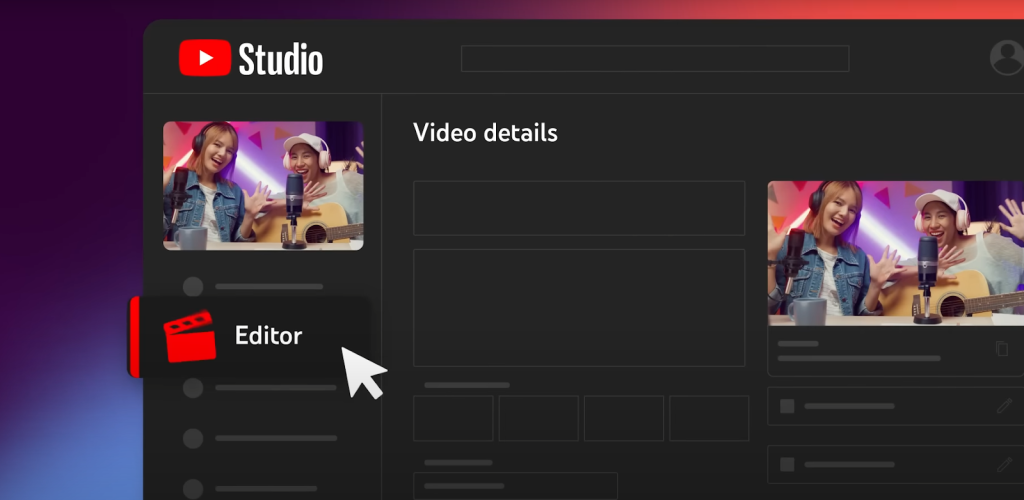
Step 5
On the left side, select “Editor.”
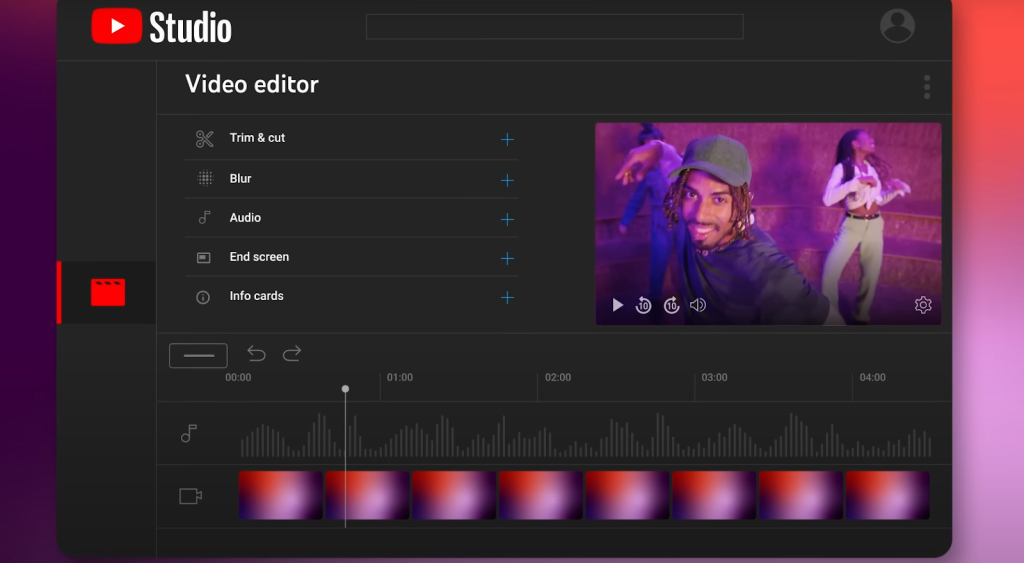
Step 6
At the top of the page, you should now be able to see options for “Trim and cut,” “Blur,” “Audio,” “End screen,” “Info cards,” and ”Ad breaks.” Press the “+” button next to “Trim and cut” to get started.
Step 7
Adjust the beginning or end of the video as desired. You can use the zoom tool on the right side to see the clips more precisely.
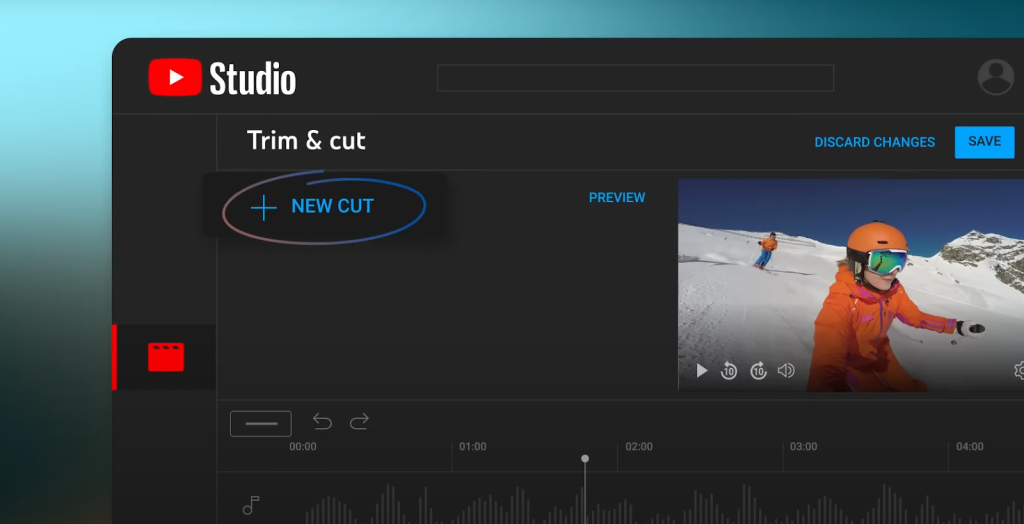
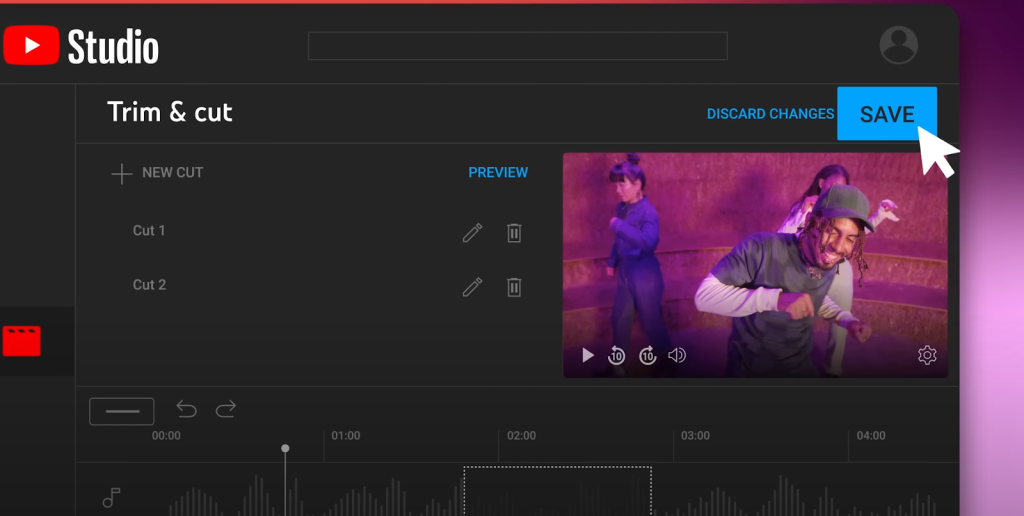
Step 8
If you want to remove a particular scene, press the “NEW CUT+” option in the top left. To remove a clip, drag the red highlighted area over the part you want to remove and press the checkmark.
Step 9
To add an end screen, go back to the options under “Video editor” and press the “EDIT” button next to “End screen.” This is where you will be able to add clickable links on the screen at the end of your video.
Step 10
To add an element, press the “+ELEMENT” button at the top left of the page. There, a menu should appear, allowing you to choose to add a “Video,” “Playlist,” “Subscribe,” “Channel,” or “Link.”
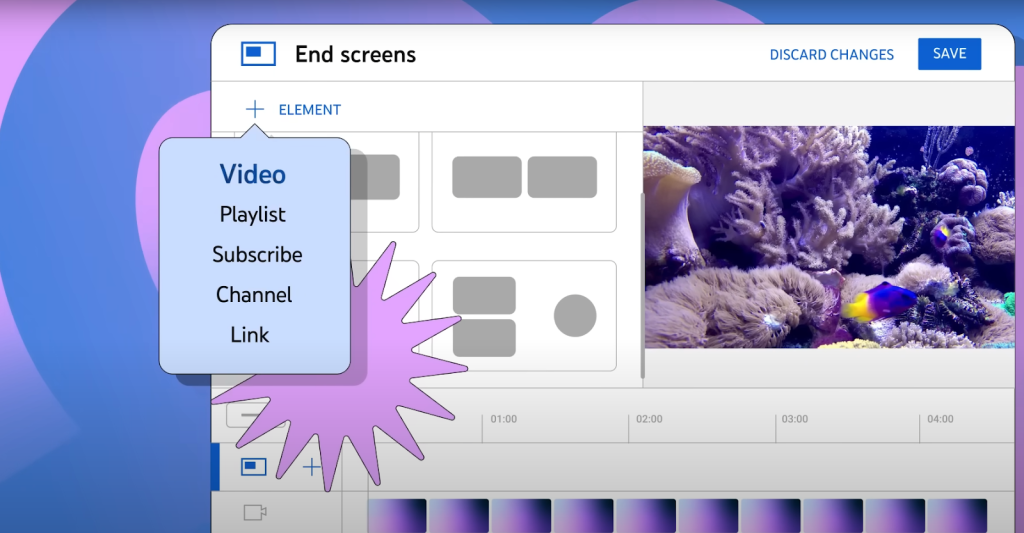
Step 11
Choose the element you would like to add, as well as the duration for which you would like it to stay on the screen above the clips and audio across the bottom of your screen. You will also be able to adjust the size and location of these elements on the preview screen.
Step 12
When everything looks right, press “Save” at the top right.
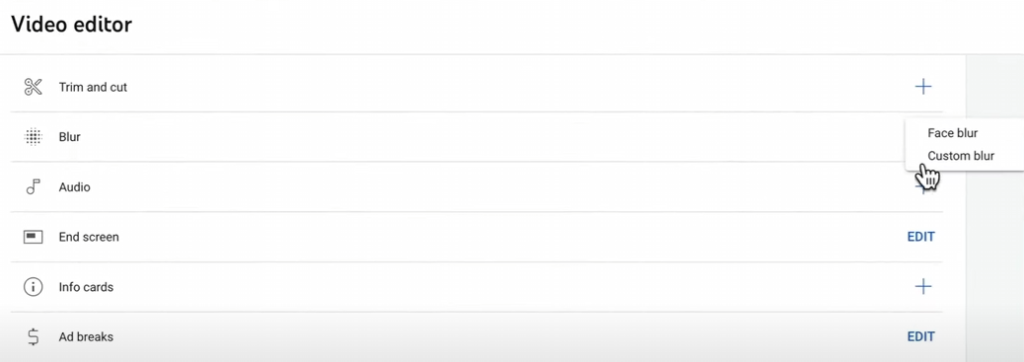
Step 13
If anything needs to be blurred throughout the duration of your video, whether it is for copyright purposes, bleeping out language, or another reason, you can do this by selecting the “+” next to “Blur” in the options under “Video editor.”
By doing this, it should bring up options for “Face blur” or “Custom blur.” Custom blurs can be oval or rectangular. These blurs can also be set to track an object or stay in a fixed position.
Step 14
Choose the desired duration of the blur in the top middle of the screen or adjust it manually in the video editor.
Step 15
Repeat this for each blur you would like to add, then press “Save” in the top right when you are finished.
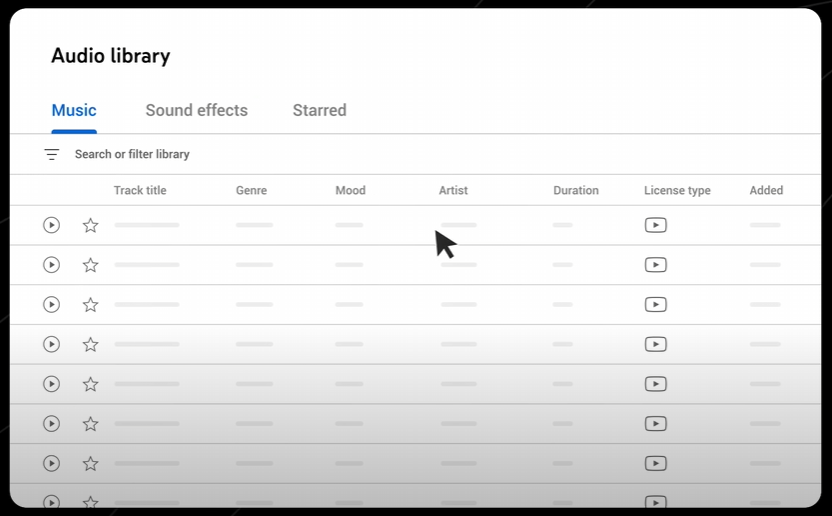
Step 16
To add audio, press the “+” next to “Audio” in the options under “Video editor.” There, you will be able to access and search YouTube’s large music library. There is also a tab for any music you may have starred in, which you can come back to later.
Step 17
After selecting a track, adjust where it goes and its duration in the editor section across the bottom where your video is.
Step 18
Adjust the volume by hovering over the track in the editor and pressing the “Adjust mix level” icon that appears on the right. Then slide the mix level over to what you want it to be.
Step 19
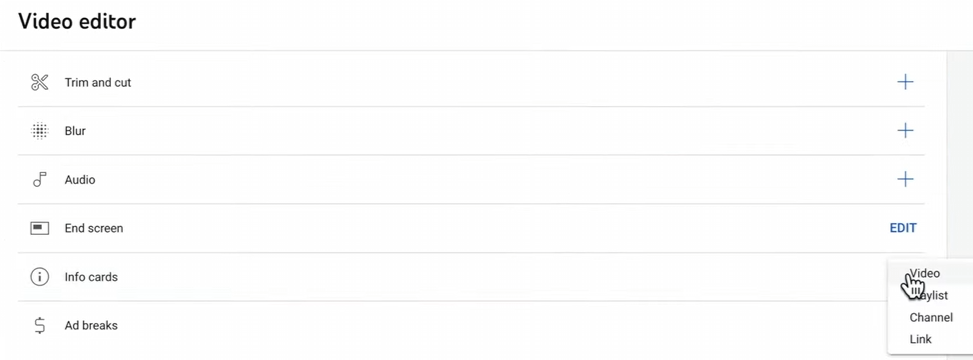
Press the “+” next to “Info Cards” in the options under “Video editor” to add cards at any point within your video. You will be able to choose from a menu that allows you to add a “Video,” “Playlist,” ‘Channel,” or “Link.”
Step 20
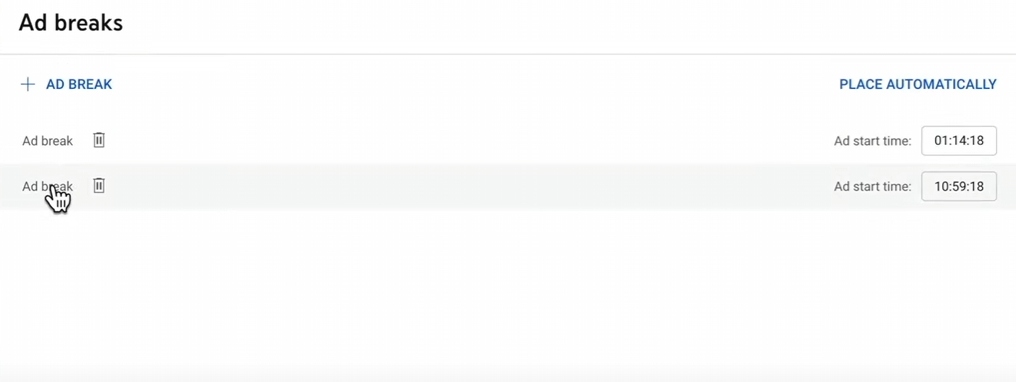
To customize where your ad breaks will play, press the “EDIT” button next to “Ad breaks” in the options under “Video editor.” Press the “+AD BREAK” button at the top to add a break and pick the start time on the right side. To remove an ad break, press the trash can icon.
Step 21
When you have the video edited the way you would like it to look, press the “Save” button in the top right corner. It may take up to a few hours for those changes to apply.
In the meantime, viewers will be able to continue seeing the original video as normal. The original video will also be stored so that if you decide you want to change your edit, you can go back and do that later.
General Video Editing Process
Proper video editing techniques are essential to get your videos played, rewatched, and gain new subscribers.
While YouTube does have a lot of built-in video editing features, there are some steps that should be considered no matter what platform you choose to edit on. Five key steps for editing a YouTube video include:
Step 1: Trimming Down the Content
This is oftentimes one of the longest steps in the YouTube video editing process. During this step, you will condense your video or your sequence of video clips so that all that remains is the main core of content you want viewers to see.
Typically, the last takes will be the best takes, so some editors find it more helpful to start backward and delete all the content that comes before the best final take.
Step 2: Adding in Your Assets
After you have trimmed the recorded footage, it is time to add all of the extra assets. This could be photos, b-roll, titles, supplementary footage, intros, outros, music, and more.
This process can also be sped up if you have an outline of what you want to add ahead of time. These touches are what make the video appear to be much more professional and engaging.
Keep in mind that any background music or sounds you add in should not overpower the rest of the video.
Step 3: Adding Effects
At this point, your audio and video should already be added. However, if you want to add additional effects and transitions, this would be the step to do so.
Depending on the tone of the video you are creating, you can also adjust the filters of the clips, such as brightness, contrast, saturation, vibrance, highlights, sharpness, white balance, and more. You can also add hues to filter certain colors.
Step 4: Watch the Final Product
Once you believe everything has been edited and adjusted the way you want it to look, you should take one final look and play the video all the way through to make sure there isn’t anything that you may have missed.
You’ll want to specifically look out for common mistakes, such as where video clips end, the written content of titles, sound adjustments, and extra fluff. These mistakes are easier to fix if you catch them ahead of time rather than find them later after the video has already been uploaded.
Step 5: Uploading the Video
If you are sure all of the video content has been edited to look and sound the way you would like it to, you are now ready to upload your video.
To make sure the video gets exported correctly, you’ll want to double-check that all of your settings are set to what they should be. If you edit within YouTube, there should already be recommendations for your best export settings.
When saving the video, make sure it is in the correct folder and will be easy to locate later. To avoid losing the video, it may be helpful to save it to your desktop before uploading.
Common Mistakes to Avoid
According to Hayden Hillier-Smith, an editor who has worked on many famous YouTuber channels such as MrBeast, Logan Paul, Mark Rober, Michelle Khare, Sam & Colby, and Alex Wassabi, there are five common mistakes that video editors make that should be avoided.
- Cutting Videos Clips Too Long
One of the biggest mistakes YouTubers make is messing up the pace of their videos. Videos can quickly drag on and lose engagement if silences and other content are removed before posting.
To avoid this, you will want to make sure you are combining clips with what is called a cut that ends on the last spoken syllable from the first clip and starts with the first spoken syllable of the next clip at the same time. The frame can be adjusted if it sounds too unnatural until it sounds clean.
- Using Unnecessary Cuts
If it takes too long to give the viewer context for the footage they are watching, this sometimes causes them to click off and look elsewhere. It is important that the motivation for the video isn’t only clear to you but to anyone watching as well.
This means each cut must be able to inform its proceeding cut. A good example of this is when vloggers introduce their videos as they are driving in their cars. If it is the drive alone, it would quickly become boring. However, most bloggers don’t just use the clip of them just simply of them driving.
They also use this scene to explain what they are on their way to go and do. All the shots in your video should have an easily justifiable reason to be there.
- Spending Too Much Time On One Exciting Idea
It is great to be excited and passionate about your work. However, if there is one idea that you spend too much time focusing on, hours may quickly slip without you even releasing it, and before you know it, you will barely have enough time to edit the rest of the video.
That is why it is important to start with editing the “boring” content first. This not only helps speed up the process but also helps you stay more motivated because you are working to be able to work on what you are most passionate about. This can be anything from the graphics you add to finding the right music.
- Choosing the Wrong Music
Making the wrong song choices for your video can mess up the overall tone or even make the video feel awkward. You should start by coming up with a purpose and tone. When choosing music, make sure it isn’t overpowering, throws off the tempo, or conveys the wrong tone.
For example, faster-paced and more exciting music may work well for some promotional or action clips. However, that doesn’t mean it will work the same way for more emotional or serious video clips.
- Not Coming Up With Compelling Ideas
None of the other steps matter unless you have good and engaging content to begin with. Although, coming up with good ideas isn’t always easy.
One of the best ways to make sure you are picking the music is by pulling inspiration from others that you feel have done this really well.
If you feel someone else has done something really well and has evoked the same emotions in you you wish to evoke in others, use their content as inspiration and add your own spin to it.

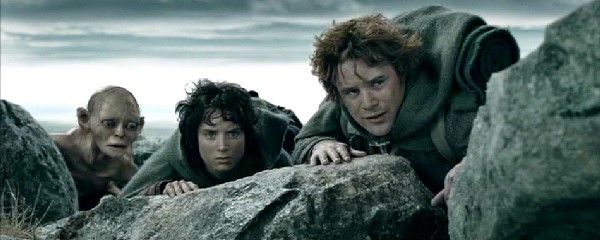
This has been done countless times throughout video editing history. Two very famous examples are the scene in The Lord of the Rings- The Two Towers where Sam and Frodo see the gates of Mordor, which was strikingly similar to a scene in The Wizard of Oz when the Lion, Scarecrow, and Tin Man try to break into the castle, and the famous “Here’s Johnny” scene in The Shining, which is rumored to be based on a scene in a silent Swedish horror film called “The Phantom Carriage.”
Posting the Video
Optimizing your YouTube video content doesn’t just stop after the video editing process. It is also important to post the video with some key factors in mind to make sure you are getting the best visibility. To reach a larger audience, YouTubers use a variety of tactics, such as creating eye-catching thumbnails, keeping a regular posting schedule, and using SEO-optimized tags and titles to make their videos rank higher.
If you have social media channels, it can also be very beneficial to share previews of your new video content there as well to drive more traction. If you plan to post regularly, you should also track your post-uploaded analytics so you will know what went right, what went wrong, and what can be improved in the future.
Final Thoughts
Producing a YouTube video is a task that merges creativity with technical know-how. Whether you choose to work with specialized software or the editing features available on YouTube, it is important to use the right strategies in your video editing process to create content that captivates viewers.
Each action, from cutting footage and adding graphics to perfecting sound and visual effects, is necessary to improve your video’s quality. However, many people make the same common mistakes.
Optimizing your video with eye-catching thumbnails and intriguing titles and strategically sharing new videos on social media platforms can greatly improve its reach and effectiveness.